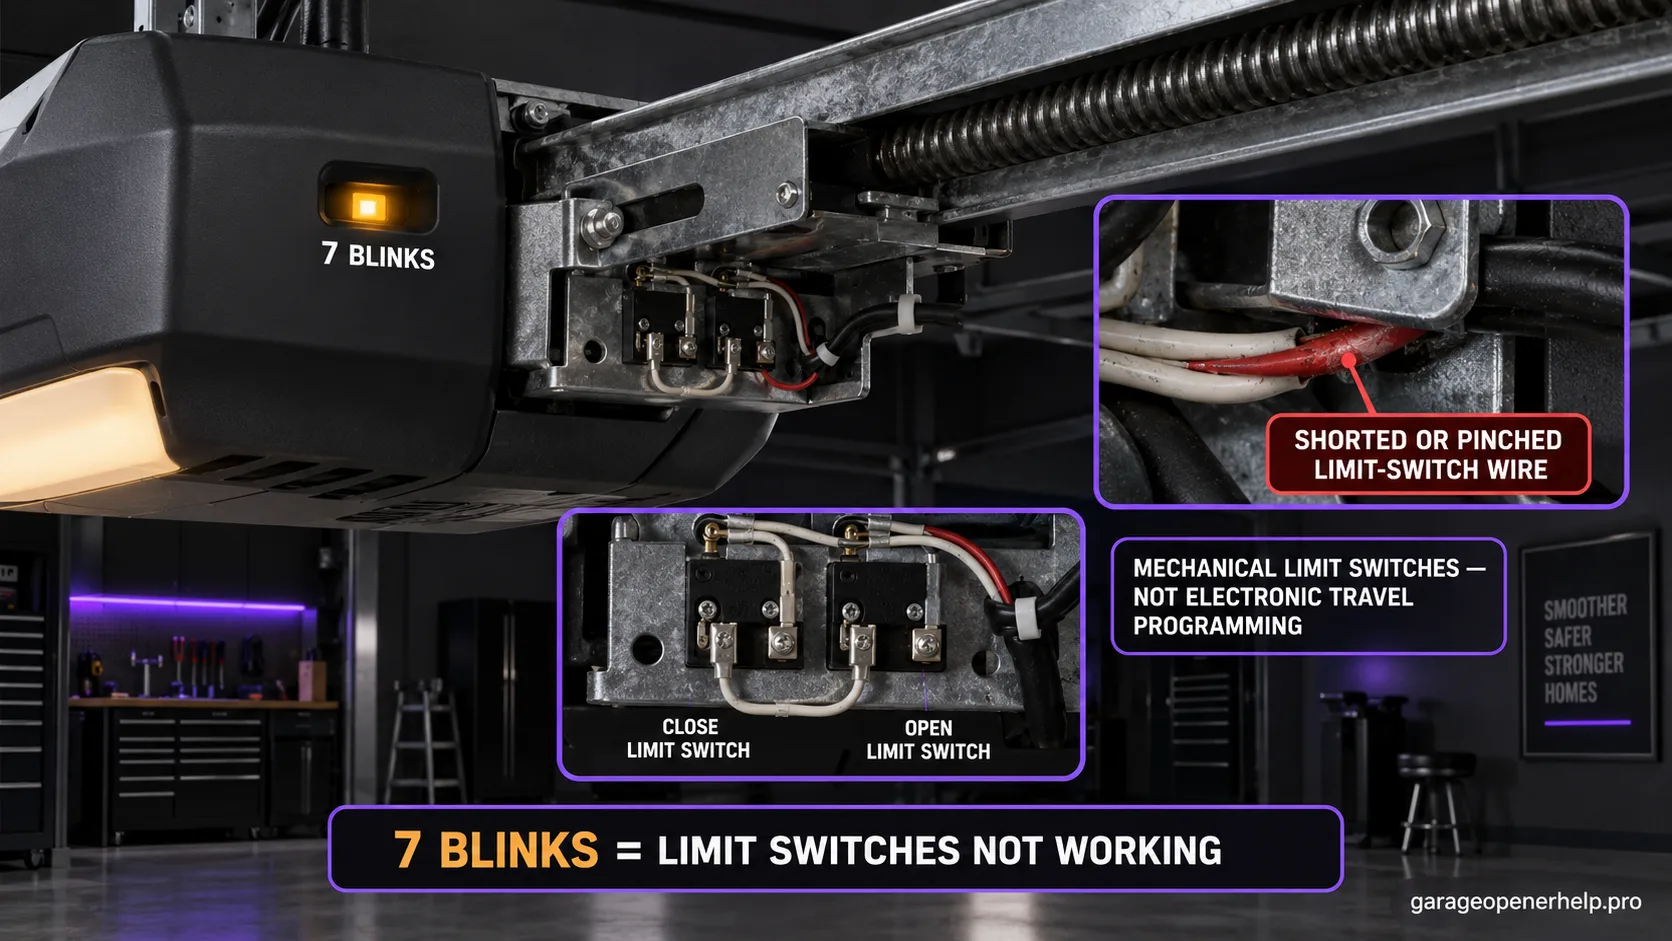
On the Genie Excelerator screw-drive family, seven repeating status-light blinks mean the limit switches are not working. Genie says to check the limit-switch wire connections at the powerhead and inspect for shorted or pinched wires under the limit-switch brackets. This is different from a newer opener's electronic travel-limit programming fault.
Diagnostic snapshot
- Answer
- Seven repeating Excelerator status-light blinks mean the physical limit switches are not working.
- Check first
- Verify the Excelerator model, then inspect the manufacturer-listed limit-switch connections and accessible switch wiring.
- Strong clue
- A repeatable failure at one travel endpoint plus the seven-blink code makes the corresponding limit-switch circuit more relevant than remote programming.
- Model / generation note
- Excelerator uses a legacy physical limit-switch system; do not substitute newer electronic travel-button instructions.
This exact manufacturer signal can feed the following diagnostic family. Keep the original code or LED pattern when troubleshooting.
What you are likely to notice
- The Excelerator status light blinks seven times, pauses, and repeats
- The door may stop before the expected open or closed position
- Travel behavior can become inconsistent even though the opener motor still runs
- The opener uses Excelerator physical limit-switch hardware covered by the legacy diagnostic chart
Check these in order
1. Identify the opener as an Excelerator before using this code
Seven blinks refer to the physical limit-switch system on the documented Excelerator family. Do not substitute instructions for modern electronic UP/DOWN travel buttons; the underlying hardware and diagnostic meaning are different.
2. Inspect accessible limit-switch wiring and terminals
Genie directs owners to check the limit-switch wire connections at the powerhead and look for shorted or pinched wires under the limit-switch brackets. Disconnect normal power before inspection when the owner's manual requires it, and avoid reaching into moving or powered hardware.
3. Record which endpoint is failing
Note whether the door fails near the open position, the close position, or both. Genie's Excelerator documentation identifies separate open and down limit-switch parts, so endpoint behavior is useful service evidence rather than a reason to randomly move both switches.
4. Avoid masking a mechanical problem with switch movement
A door that is heavy, binding or off-track can create travel symptoms that coexist with a switch issue. Verify safe door condition separately. If the switch circuit is intact but seven blinks persist, move to exact-model service rather than shifting the limit hardware until the symptom disappears.
Excelerator limit switches are not the same as modern electronic travel buttons
The Excelerator chart points to physical limit-switch wiring and brackets. Modern Genie openers can use electronic travel programming instead. Mixing those procedures can make a simple legacy fault much harder to understand, so identify the opener family before searching for a reset sequence.
Genie lists separate open and down limit-switch parts in the Excelerator diagnostic material. Record which endpoint fails before touching either side.
Shorted or pinched switch wire is a manufacturer-listed cause
The official seven-blink instruction is not simply 'adjust the limit.' Genie tells owners to check the wire connections at the powerhead and inspect for shorted or pinched wires under the limit-switch brackets. That makes wiring condition part of the diagnosis, not an afterthought.
If wiring insulation is damaged near moving rail hardware, stop normal operation until the condition is understood. Repeated travel can worsen a pinch or create inconsistent switch signals.
Keep mechanical travel and switch signaling separate
A heavy or binding garage door can stop before an endpoint even when the limit switch is healthy. Conversely, a faulty switch circuit can stop a mechanically healthy door at the wrong point. Manual door condition and the seven-blink code are two separate pieces of evidence that should be recorded together.
Avoid moving both limit switches by trial and error. If the documented wiring check does not resolve the code, preserve the original switch positions for model-specific service.
Why one failed endpoint is more useful than saying the door “stops wrong”
The Excelerator diagnostic documentation names separate open and down limit-switch parts. If the door consistently fails only at the open end, record that. If it only fails near fully closed, record that instead. A one-endpoint pattern gives support a much cleaner starting point than moving both switches at once.
Also note whether the motor continues trying to move after the expected endpoint or stops prematurely. Do not reach into the rail while the opener is powered; the goal is observation, not live adjustment around moving drive hardware. If a technician becomes necessary, include whether the open or down endpoint fails, whether the switch wire looks pinched, and whether the seven-blink code appears immediately or only after attempted travel. Also record whether the door stops at the same physical point every cycle; repeatability helps separate a switch-position signal from a random obstruction or intermittent mechanical bind.
Stop DIY troubleshooting when…
- The door is mechanically unsafe or difficult to move
- Limit-switch wiring is damaged where it cannot be safely accessed
- The limit brackets or rail hardware are damaged
- Seven blinks persist after manufacturer-directed connection checks
Garage door springs, cables and a falling/unbalanced door can store or release dangerous force. Those are door-system problems, not just opener settings.
Common questions
What do seven Excelerator blinks mean?
Genie says the limit switches are not working.
Should I reprogram UP/DOWN electronic limits?
Not from this code alone. Excelerator uses a legacy physical limit-switch system; use the correct model manual.
Can pinched limit-switch wiring cause seven blinks?
Yes. Genie specifically tells owners to check for shorted or pinched wires under the limit-switch brackets.
Manufacturer sources used
These links are the factual baseline for the diagnostic claims above. Model-specific manuals can supersede general guidance.